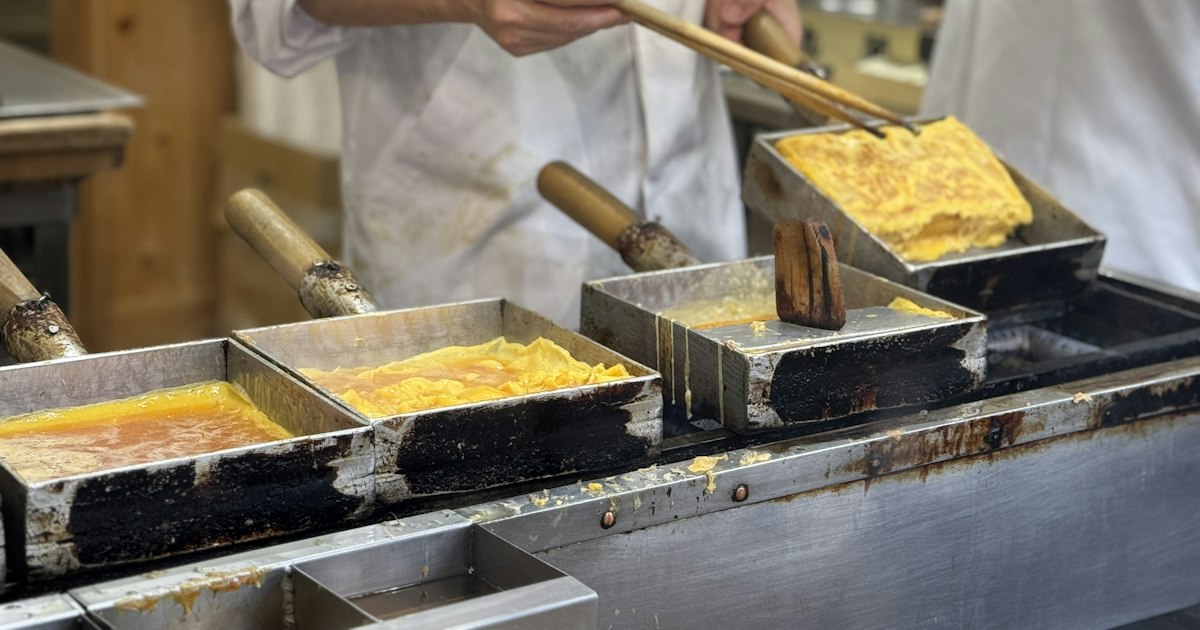
If you’ve ever wondered why your rolled Japanese omelette comes out lumpy and uneven while the ones in bento boxes look like perfect little bricks, the answer is usually the pan. Tamagoyaki (玉子焼き) — sweet-savory layered omelette — is made in a rectangular or square pan specifically designed for rolling, not a round skillet. These pans are sold everywhere from ¥100 shops to centuries-old coppersmiths, and picking the right one, plus learning the actual technique, makes a bigger difference than any recipe tweak. Here’s how to buy one in Japan and use it properly once you get it home.
What Makes a Tamagoyaki Pan Different
A tamagoyaki pan (tamagoyaki-ki or makiyaki-nabe) is rectangular, usually around 13cm x 18cm, with low straight sides and sharp corners. That shape exists for one reason: rolling. You pour a thin layer of beaten egg, let it half-set, then roll it toward you with chopsticks or a spatula, push it back, pour the next layer underneath, and repeat. The straight edges let you form tight, square-ish layers; a round pan just gives you a messy spiral. Some pans come with a wooden handle riveted or welded onto one long side, positioned so your wrist angle matches the rolling motion.
Sizes vary slightly by region — Kanto-style pans tend to be more rectangular (roughly 2:1 ratio), while some Kansai-style pans are closer to square, reflecting slightly different omelette shapes used in regional bento traditions. Either works fine for a home cook; the difference is cosmetic.
Copper, Iron, or Nonstick: Choosing Material
Copper (dousei): The traditional choice, especially tin-lined hand-hammered pans from Tokyo coppersmiths. Copper heats fast and evenly, which matters for tamagoyaki because uneven heat means some layers overcook while others stay raw. These are heavier, need the tin lining re-done every several years with heavy use, and are the most expensive option.
Iron (tetsu): Heavier than copper, holds heat well, and develops a natural non-stick patina over time if you season it properly — similar in spirit to a well-used cast iron skillet. Needs drying and light oiling after every wash to prevent rust.
Nonstick aluminum: The practical choice for most travelers and home cooks. No seasoning, no rust risk, rolls out easily even for beginners. The coating eventually wears out (usually after a few years of regular use), but for the price, it’s hard to argue against.
Where to Buy One in Japan
For the widest selection in one place, head to Kappabashi Dougu Street (合羽橋道具街) in Asakusa, Tokyo — a stretch of restaurant-supply shops that has sold professional cookware since the Meiji era. Most shops are open roughly 9:00 or 9:30 to 17:00 or 17:30, and some close on Sundays, so a weekday visit is safer. The nearest station is Tawaramachi on the Ginza Line, about a 5-minute walk; Asakusa Station on the same line works too, with a slightly longer walk. Here you’ll find everything from ¥1,500 aluminum pans to hand-hammered copper pans well over ¥20,000, often sold alongside the chopsticks and spatulas made for them.
If Kappabashi isn’t on your route, department store kitchenware floors (Tokyu Hands, Loft, or the basement kitchen sections of stores like Takashimaya and Isetan) stock reliable mid-range brands such as Yoshikawa. For a rock-bottom budget option, Don Quijote and 100-yen shops like Daiso sometimes carry small nonstick versions, though quality is inconsistent. Supermarkets with a housewares aisle (Life, Aeon) are a convenient backup if you’re staying somewhere with a kitchen and need one quickly. Department stores are also where you’ll find well-made Japanese kitchen goods generally — the same floors that stock imported treats like the ones covered in this guide to department store baumkuchen brands usually have a dedicated cookware section worth browsing.
Seasoning and Caring for a Traditional Pan
If you buy iron or unlined copper, season it before first use: heat the empty pan, wipe it with a vegetable-oil-soaked cloth, and repeat a few times until the surface darkens slightly. After every use, wash with hot water only (no soap on iron pans, to protect the patina), dry immediately over heat for a few seconds, then wipe with a thin layer of oil before storing. Skipping this step is the single biggest reason iron tamagoyaki pans rust or stick — Japanese kitchen shops will often remind you of this when you buy one, and some sell a small bottle of camellia oil (tsubaki oil) specifically for the job, similar in spirit to how other traditional wood and metal goods in Japan need their own upkeep — the same logic applies to hinoki wood bath goods, which also need specific care to last.
How to Actually Make Tamagoyaki
Beat eggs with a splash of dashi, soy sauce, and sugar or mirin (ratios vary by region and household — Kansai-style tends sweeter). Heat the pan over medium, oil it lightly with a folded paper towel or a tamagoyaki-specific brush, and pour in just enough egg to thinly coat the bottom. When it’s mostly set but still slightly wet on top, roll it toward the handle end using chopsticks or a thin spatula, then slide it back to the far end. Oil the empty space again, pour in the next thin layer, lift the rolled portion slightly so the new egg flows underneath, and roll again. Repeat four or five times until you have a tidy log, then let it rest briefly before slicing into squares.
Common Mistakes to Avoid
- Heat too high: tamagoyaki should cook on medium to medium-low heat; high heat browns the outside before the inside sets, giving you a tough, unevenly colored roll.
- Not enough oil between layers: this causes sticking and tearing when you roll. Re-oil the pan before every new layer, even if it looks fine.
- Pouring too much egg at once: thin layers roll cleanly; thick ones don’t hold their shape and leak egg when sliced.
- Skipping the rest: cutting the roll immediately causes it to unravel. A minute or two of resting, ideally wrapped in a sudare (bamboo mat) or foil, helps it hold its shape.
Budget, Mid-Range, and Splurge Picks
For a souvenir you’ll actually use: a nonstick aluminum pan (roughly ¥1,500–¥3,000) is the easiest to pack, easiest to use, and the safest first purchase if you’ve never made tamagoyaki before. A mid-range iron pan (¥3,000–¥7,000) from a Kappabashi shop or department store rewards a bit of maintenance with better browning and a pan that improves with age. For a genuine splurge and a standout souvenir, a hand-hammered, tin-lined copper pan from an Asakusa coppersmith (¥15,000 and up, sometimes well over ¥30,000 for larger or more ornate pieces) is both a functional cooking tool and the kind of handmade craft item — like the artisan scrub brushes covered in this guide to tawashi brushes — that’s worth seeking out from the original maker rather than a generic import version.
Whichever pan you choose, pack it in checked luggage rather than a carry-on if it’s metal and rigid-edged, and wrap it in clothing to prevent dents — copper pans especially show every scratch. Once home, a tamagoyaki pan earns its cabinet space fast: beyond omelettes, it’s useful for any dish that benefits from an even, low layer of heat, from pancakes to small portions of pan-fried fish.