Japan Trove

Author: JapanTrove Editorial

  • Yakiniku in Japan: How to Grill and Order Like a Local

    Yakiniku in Japan: How to Grill and Order Like a Local

    Photo by Zion C on Unsplash

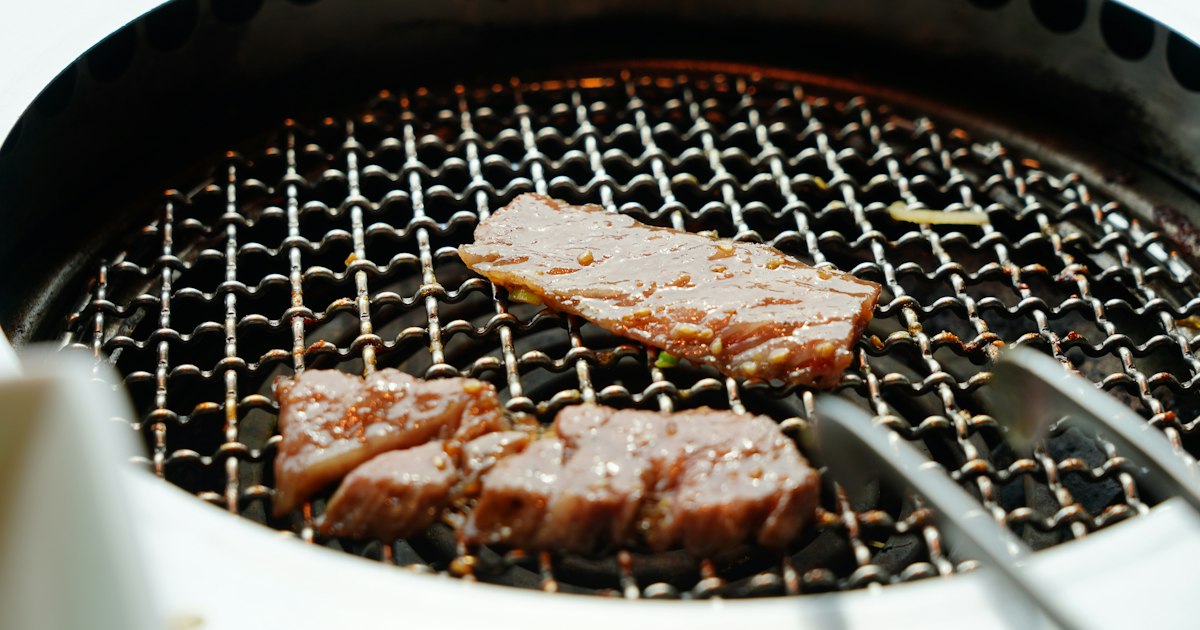
    Yakiniku — literally “grilled meat” — is Japan’s answer to the barbecue table: thin slices of beef, pork, and offal cooked over a tabletop grill and dipped in tangy sauce. It’s one of the most approachable meals for visitors because you can see and control exactly what’s cooking, but the menus, sauces, and unwritten rules trip up a lot of first-timers. Here’s how to walk in, order well, and grill without embarrassing yourself.

    What Yakiniku Actually Is (and How It Differs From Korean BBQ)

    Yakiniku developed in Japan’s Korean communities in the 20th century and has since become thoroughly Japanese in style. Compared to Korean BBQ, portions are smaller and pricier per piece, cuts are sliced thinner, and the focus is squarely on beef quality — especially wagyu — rather than a huge spread of banchan-style side dishes. You’ll typically get one or two simple sides (kimchi, salad, cold tofu) rather than the dozen small plates common in Korea. Grills are usually gas or charcoal built into the table, with a small vent or duct overhead to pull away smoke.

    How to Order: Cuts You’ll See on Every Menu

    Menus are organized by animal and cut, and reading a few key words will get you far even without Japanese:

    • Karubi (カルビ) — short rib, boneless and fatty. The classic starter cut, usually ¥600–¥1,500 per plate.
    • Rosu (ロース) — loin, leaner than karubi with a cleaner beef flavor.
    • Tan (タン) — beef tongue, often sliced thick and eaten with lemon and salt rather than sauce.
    • Harami (ハラミ) — skirt steak, technically offal but tender and mild; a local favorite.
    • Horumon (ホルモン) — offal (intestine, stomach), cheap and popular with regulars, less so with squeamish first-timers.
    • Wagyu (和牛) — Japanese beef breeds like Kuroge Wagyu, sold at a premium; look for prefecture-branded versions like Omi, Hida, or Saga beef if you want a specific regional pedigree.

    Most restaurants offer set courses (course or tabehodai for all-you-can-eat) alongside à la carte ordering — courses are the easier choice if you don’t want to decode a full menu.

    How to Actually Grill It

    A few habits separate a good yakiniku meal from a burnt or undercooked one:

    • Don’t overcrowd the grill. Cook in small batches so each piece touches hot metal, not other meat.
    • Flip once. Thin slices (2–4mm) cook in 30–90 seconds per side over a hot grill. Constant flipping dries the meat out.
    • Cook fatty cuts (karubi) before lean ones (tan, rosu) so the grill isn’t coated in char before your delicate cuts go on.
    • Use the tongs provided for raw meat, and separate ones (or chopsticks) for eating — many restaurants supply two sets specifically to avoid cross-contaminating cooked food with raw meat juices. This is one of the most common visitor mistakes.
    • Change or scrape the grill grate when it gets black with residue; staff usually swap it if you ask (“abura-ami, kōkan onegaishimasu” — “please change the grill mesh”).

    Sauces and Sides

    Tare (タレ), the sweet-savory soy-based dipping sauce, is the default at most tables, but good shops also offer shio (salt) and miso-based options — ask for tan shio (salted tongue) specifically, since tongue is almost always served this way rather than with tare. Garlic chips, grated daikon with ponzu, and a squeeze of lemon are common counterpoints to rich, fatty cuts. Rice, cold reimen (Korean-style cold noodles), or a simple soup usually round out the meal — order rice partway through rather than at the start, since it works best alongside grilled meat rather than before it.

    Budget, Mid-Range, and Splurge Options

    Yakiniku spans an enormous price range:

    • Budget (¥2,000–¥3,500 per person): Chain restaurants like Gyu-Kaku, Yakiniku King, or Anan offer all-you-can-eat (tabehodai) courses, often 90–120 minutes, heavy on karubi and rosu with unlimited drinks (nomihodai) as an add-on for roughly ¥1,000–¥1,500 more.
    • Mid-range (¥4,000–¥8,000 per person): À la carte neighborhood yakiniku-ya with better sourcing, more offal variety, and attentive service. Common in areas like Tsuruhashi in Osaka (Osaka’s historic Korean-Japanese yakiniku district) or Shin-Okubo in Tokyo.
    • Splurge (¥10,000–¥20,000+ per person): Specialty wagyu restaurants serving A5-graded beef, often omakase-style with no printed prices, or set courses that walk through a progression of cuts. Worth it once for the marbling texture alone.

    Timing, Hours, and Getting a Table

    Most yakiniku restaurants open for dinner around 17:00–17:30 and run until 23:00–24:00, with some chains also open for lunch (11:00–14:00) offering cheaper set lunches (¥1,000–¥1,500). Weekend dinner slots at popular spots fill up, so reserve a few days ahead if possible, especially for parties of four or more — many restaurants take reservations by phone only, so ask your hotel concierge to call if you don’t speak Japanese. Summer is peak yakiniku season in Japan (there’s even a “Yakiniku Day” on August 29, a pun on the numbers 8-2-9 sounding like “niku”), but it’s a satisfying meal any time of year, including as a warming dinner in winter.

    Common Mistakes to Avoid

    • Ordering too much at once. Start with 2-3 cuts per person and reorder — meat is best grilled fresh, not sitting on a plate going cold.
    • Ignoring the exhaust duct position. Push smoky items toward the vent rather than letting smoke drift toward other diners.
    • Skipping the raw-meat tongs rule. Reusing raw-meat tongs to eat is a genuine hygiene lapse, not just etiquette.
    • Assuming tabehodai means unlimited time. Most all-you-can-eat courses have a strict time limit (often 90–100 minutes) with a last-order cutoff — watch the clock.

    If you’re building out a broader food itinerary around Japan, pairing a yakiniku dinner with something lighter earlier in the day — like onigiri for lunch or a stop for taiyaki for dessert — keeps the day from feeling too heavy. And if you’re stocking up on Japanese seasonings or sauces to recreate tare at home, a browse through a local supermarket like Gyomu Super is worth the detour before you fly home.

  • Daruma Dolls: Japan’s Goal-Setting Talisman and Where to Buy

    Daruma Dolls: Japan’s Goal-Setting Talisman and Where to Buy

    Photo by Issy Doherty on Unsplash

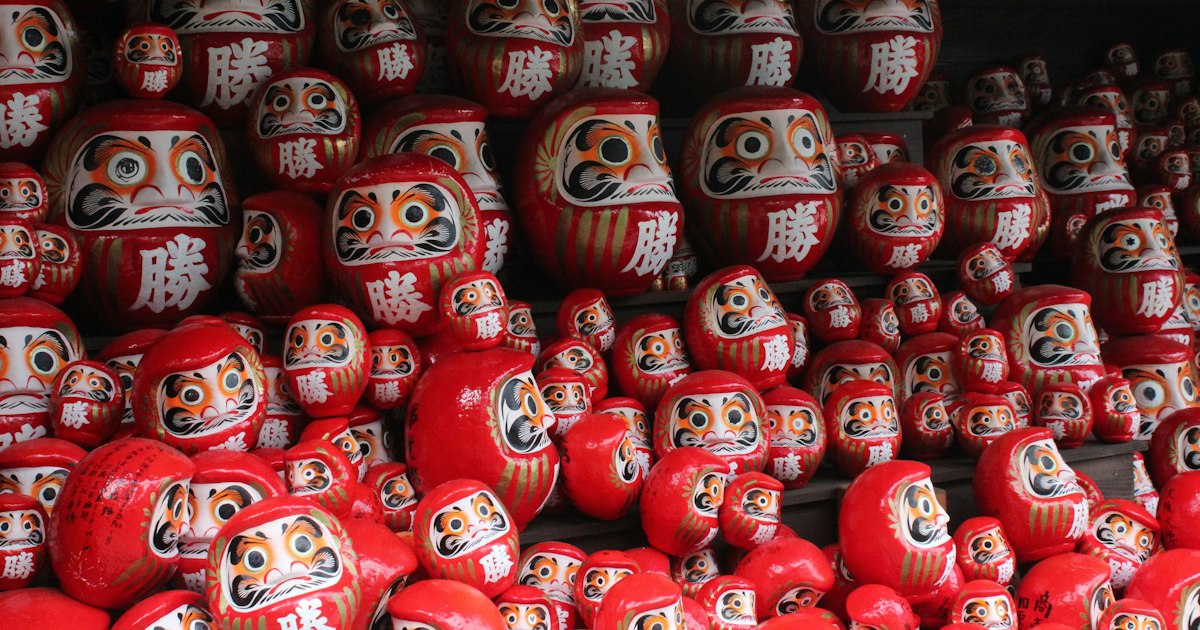
    Round, red, and staring at you with two blank white eyes, the daruma doll is one of Japan’s most recognizable talismans — and one of the easiest souvenirs to actually use rather than just display. Modeled after Bodhidharma, the monk credited with founding Zen Buddhism, a daruma is a hollow, bottom-weighted figure that always rights itself when knocked over, a physical reminder of the proverb “nana korobi ya oki” — fall down seven times, get up eight. Here’s how the goal-setting ritual works, where daruma dolls are actually made, and where to buy one that isn’t just mass-produced plastic.

    What Is a Daruma Doll, Really?

    Traditional daruma are made of papier-mâché over a mold, hand-painted, and left hollow so a weight in the base makes them self-righting (the same okiagari-koboshi mechanism used in some children’s toys). The classic color is red, associated with good fortune and warding off illness, but you’ll now find gold for wealth, white for love or purity, and yellow for study luck, among others. Most are sold with completely blank eyes — the blankness is the point, not a manufacturing defect.

    Daruma sit somewhere between souvenir and folk craft, similar in spirit to the hand-turned kokeshi dolls of Tohoku — both are regional crafts tied to a specific production town, both make honest, packable souvenirs, and both reward buying from the source rather than an airport gift shop.

    How to Use a Daruma: The Two-Eye Goal Ritual

    The ritual is simple and is exactly why daruma make better souvenirs than most: when you set a goal — passing an exam, starting a business, running a race — you pick up a black pen or included ink and fill in one eye, traditionally the left one as you look at the doll. The daruma then sits somewhere visible, one-eyed and watching, as a daily nudge. When the goal is achieved, you paint in the second eye to “complete” it. Politicians famously do this on election night; small business owners do it when a shop opens; students do it before entrance exams.

    Traditionally, a daruma is kept for one year and then returned — many people bring their year-old daruma back to the temple or shrine where they bought it (or any temple that accepts them) for a ceremonial burning called daruma kuyo, usually held around New Year, and a fresh daruma is purchased to start the next cycle. This overlaps with Japan’s broader New Year renewal customs, in the same spirit as the seasonal purification rituals covered in our guide to Setsubun, Japan’s bean-throwing festival.

    Takasaki: The Daruma Capital of Japan

    If you want the real thing, go to Takasaki in Gunma Prefecture, which produces the large majority of Japan’s daruma dolls and has done so since the late 1700s. The city’s version, known as Takasaki Daruma, has a distinctive face with bushy eyebrows shaped like a crane and a mustache shaped like a turtle — both symbols of longevity.

    Takasaki is easy to reach: it’s about 50 minutes from Tokyo Station on the Joetsu Shinkansen. The spiritual home of the local industry is Shorinzan Daruma-ji, a temple a short taxi ride (roughly 10 minutes) or a longer bus ride from Takasaki Station; temple grounds are free to enter and generally open from early morning to early evening daily. Several workshops around the city also sell daruma directly and, at some, you can watch or even try the hand-painting process yourself.

    The big event is the Takasaki Daruma Ichi (Daruma Market), held every year on January 6th and 7th at Shorinzan Daruma-ji, drawing hundreds of stalls and hundreds of thousands of visitors who come to buy the year’s new daruma and burn the old one. If your trip lines up with early January, it’s genuinely worth the detour — it’s one of the largest daruma markets in the country and far more atmospheric than buying one off a souvenir shelf.

    Where Else to Buy a Daruma Doll

    You don’t need to go to Gunma to get one, though quality and authenticity vary a lot by where you look:

    • Budget (¥500–¥1,500):
    • small daruma (roughly 6–10cm) are sold at temple and shrine gift counters nationwide, at Asakusa’s Nakamise shopping street in Tokyo, and at general souvenir shops and even some Don Quijote branches. Fine for a desk-sized keepsake, though quality is often mass-produced.

    • Mid-range (¥2,000–¥6,000): medium daruma (15–20cm) from craft shops, department store New Year fairs (held in December and January), or directly from Takasaki workshops. These are properly hand-painted and a better gift.
    • Splurge (¥10,000+): large daruma (30cm or taller), often bought by shopkeepers and companies for a New Year display, available from specialty daruma shops in Takasaki or by special order.

    Outside Gunma, another well-known daruma destination is Katsuo-ji in Minoh, on the outskirts of Osaka (admission is a modest fee, around ¥400), a mountainside temple famous for “victory daruma” bought by athletes, students, and business owners — the approach to the main hall is lined with thousands of orange-red daruma left behind by past visitors, which makes for a striking photo stop even if you don’t buy one.

    Choosing the Right Size and Color

    Size matters mostly for where you’ll display it and how you’ll get it home. A palm-sized daruma fits in a suitcase without a second thought; anything over 20cm is bulky, and the traditional papier-mâché construction, while surprisingly sturdy, isn’t crush-proof in checked luggage. If you’ve bought a large one, or several as gifts, it’s worth reading our guide to shipping souvenirs home from Japan to compare post office and courier options rather than risk it in a suitcase.

    On color: red is the safe, traditional default and works for any general goal. If you’re buying as a gift for someone with a specific ambition, gold (wealth or business success), white (romance or a clean start), or yellow (academic success) are all readily available at craft shops and make the gift feel more personal.

    Common Mistakes to Avoid

    A few things trip up first-time buyers. Don’t paint both eyes in at the same time — the entire point is that one eye stays blank until the goal is actually achieved; painting both immediately turns it into a plain ornament rather than a working talisman. Don’t assume every daruma you see is from Takasaki — cheaper souvenir-shop versions are often generic imports, so if authenticity matters to you, look for a maker’s mark or buy from a temple shop or Gunma-based retailer. And don’t expect every daruma seller to speak English or have online stock lists — Takasaki’s craft workshops are small, family-run operations, so if you have a specific size or color in mind, going in person or asking your hotel to call ahead works better than trying to order remotely.

    When Your Wish Comes True (or Doesn’t)

    You’re not obligated to return your daruma to Japan every year. Many visitors simply bring theirs home, paint the second eye whenever the goal is met, and keep it as a memento afterward — there’s no rule against that. If you happen to be back in Japan around New Year with an old daruma in hand, most temples that sell them (Shorinzan Daruma-ji included) will accept old ones for the ceremonial burning even if it wasn’t purchased there, so it’s fine to bring it along rather than store it indefinitely. Either way, it’s a rare souvenir that actually asks something of you after you’ve left the shop — which is exactly why it’s worth buying one on purpose rather than picking one up as an afterthought.

  • Japanese Folding Fans (Sensu): A Buying Guide & How to Use Them

    Japanese Folding Fans (Sensu): A Buying Guide & How to Use Them

    Photo by Jacek Dylag on Unsplash

    Every souvenir shop in Japan sells something folded and fan-shaped, but most of it is printed nylon on plastic ribs, made for a keychain rack rather than actual use. A real sensu — bamboo or wood ribs, paper or silk leaf, hand-finished — is a different object entirely, and buying one well means knowing what to look for and where to look. Here’s how to shop for a folding fan in Japan without overpaying for a souvenir or underpaying for a copy.

    Sensu vs. Uchiwa: Know What You’re Buying

    Japan has two distinct fan types and shops often mix them on the same shelf. A sensu (扇子) is the folding fan — ribs radiate from a rivet and collapse flat. An uchiwa (団扇) is the flat, non-folding paddle fan, traditionally given away free at summer festivals and by shops as advertising. If you want the classic pocketable fan to bring home, you’re looking for sensu specifically; uchiwa are fun but bulkier and usually cheaper, mass-produced items.

    Within sensu there are two main use-cases sold side by side: fans for cooling yourself (everyday sensu, men’s and women’s styles differ slightly in size and pattern) and fans for display or ceremony (maiko/geisha-style fans, tea ceremony fans, dance fans used in Noh and Japanese dance). Dance and ceremonial fans are not meant to be snapped open and shut for a breeze — the paper is more delicate and the price reflects craftsmanship, not durability for daily use.

    How to Tell a Real One From a Souvenir Fan

    A few quick checks work in any shop:

    • Ribs: Real bamboo ribs feel slightly warm and have faint grain variation; plastic ribs feel uniformly cool and perfectly smooth. Cheap fans use thin plastic that flexes and creaks.
    • Rivet (kaname): A well-made fan has a metal or bone rivet that holds tension without wobbling. Give it a gentle open-close — it should move smoothly, not gritty or loose.
    • Paper: Quality sensu use washi (Japanese paper) laminated over the ribs by hand, sometimes gilded or block-printed. Machine-printed nylon fans have a slight sheen and the pattern often looks slightly blurry up close.
    • Number of ribs: Everyday fans typically have 15–25 ribs; more ribs generally (not always) signals a finer, more expensive fan.
    • Smell: Real bamboo and washi have a faint natural, slightly woody smell. Synthetic fans smell like plastic or nothing at all.

    Look at the box, too — fans sold in a plain plastic sleeve at an airport are almost always the printed-nylon type; fans in a paper or wood box from a specialty shop are more likely handmade.

    Where to Buy: Kyoto, Tokyo, and Beyond

    Kyoto is the center of sensu production and the best place to buy seriously. Miyawaki Baisenan (宮脇賣扇庵), near Nijo Castle, has been making fans since 1823 and stocks everything from ¥1,000 everyday fans to museum-quality pieces; open roughly 9:00 to 18:00, closed some Wednesdays. Kyosen-do and shops along Shijo-dori and in the Gion area also carry hand-made fans, and several offer fan-painting or assembly demonstrations you can watch through a window.

    In Tokyo, Ibasen in Nihonbashi (founded in the Edo period) is the equivalent destination, known for ukiyo-e-style prints and both sensu and uchiwa; it’s a short walk from Nihonbashi Station and open daily except some holidays, roughly 10:00–18:00. Asakusa’s shopping streets near Senso-ji also sell decent mid-range fans, though quality varies stall to stall, so apply the checks above before buying.

    If your itinerary includes smaller craft towns, it’s worth asking at local pottery or craft shops too — the same browsing mindset used for Japan’s rustic pottery towns applies here: talk to the shopkeeper, ask what’s handmade versus imported, and don’t be shy about asking to see the ribs up close.

    Prices: Budget, Mid-Range, and Splurge

    Budget (¥1,000–3,000): Simple bamboo-rib, printed-paper fans in seasonal patterns (cherry blossoms, waves, bamboo) — a perfectly good everyday cooling fan and a reasonable gift.

    Mid-range (¥3,000–10,000): Hand-applied washi with block-printed or hand-painted designs, sometimes lacquered ribs, from a named workshop. This is the sweet spot for a self-purchase souvenir that will actually last years of summer use.

    Splurge (¥15,000–50,000+): Fully hand-painted fans, gold-leaf work, silk leaves, or fans by a named craftsperson. Ceremonial and maiko-style fans used professionally can run even higher. If you’re shopping in this range, buy from a specialty shop rather than a department store fan corner, and ask for a certificate or maker’s card.

    Best Time to Buy and Seasonal Notes

    Fans are sold year-round, but shops stock the widest selection from late spring through summer (April–August), when demand peaks and new seasonal patterns arrive. Buying in autumn or winter can actually work in your favor — selection is smaller but sales and clearance on the previous summer’s designs are common. If your trip coincides with a summer festival, note that street-stall fans sold near festival grounds are almost always the cheap uchiwa-style giveaway type, not something to buy as a serious souvenir.

    How to Use and Care for a Sensu

    Hold the fan by the outer guard rib (the thicker rib on one side) and open it with a light outward flick — resist the urge to force it fully open in one motion, which stresses the rivet over time. Fan yourself with a loose wrist motion rather than large arm swings; a folding fan moves a surprising amount of air with very little effort. To close, fold from the same guard rib inward, ribs meeting evenly — don’t slam it shut, which is the single most common way people crack the paper along a fold line.

    A few etiquette notes worth knowing: in formal settings (tea ceremony, some traditional restaurants) a closed fan is sometimes placed on the floor in front of you as a symbolic boundary marker rather than used for cooling — you won’t be expected to know this as a visitor, but it explains why you might see it. Store the fan closed in its box or a cloth sleeve when not in use, keep it away from humidity and direct sun (paper fans can warp or fade), and never force-dry a fan that’s gotten wet — let it air dry fully open, away from heat.

    Packing and Getting It Home

    A folded sensu is flat and slim enough to go in a jacket pocket or bag without any special packing, but for a good-quality or gilded fan, keep the original box — it’s sized to prevent the ribs from bending in transit. If you’ve bought several fans along with other fragile crafts and are worried about your luggage, it’s worth reading up on shipping souvenirs home from Japan, since post offices and couriers can box and send delicate items more safely than checked luggage. And if a fan feels like an easy, packable gift, it pairs naturally with other classic small crafts to bring home, like a printed tenugui hand towel — both fold flat, both hold up well as everyday souvenirs rather than shelf decorations.

  • Ine no Funaya: Kyoto Prefecture’s Boathouse Fishing Village

    Ine no Funaya: Kyoto Prefecture’s Boathouse Fishing Village

    Photo by Luca Bravo on Unsplash

    Two and a half hours north of Kyoto’s temples and crowds, the fishing town of Ine sits wrapped around a calm, almost perfectly circular bay. What makes it worth the trip is a row of roughly 230 funaya — wooden boathouses built directly over the water, boats parked on the ground floor and living quarters above. Locals have fished from these same structures for generations, and from the water they look like a floating village. It’s often nicknamed the “Venice of Japan,” which oversells the scale but gets the atmosphere right: quiet, working, and unlike anywhere else on the Kyoto side trip circuit.

    What Makes Ine’s Funaya Unique

    A funaya is a two-story wooden building with its ground floor open directly onto the bay so a fishing boat can be pulled straight in out of the weather. Families have historically lived upstairs, worked downstairs, and used the narrow lane behind the houses as the “front” street, with the bay effectively serving as their front yard. Ine Bay is sheltered and shallow, with almost no tidal range, which is the specific reason this building style survived here for centuries when it didn’t elsewhere on Japan’s coast. Around 230 funaya line about 5 km of shoreline, and many are still in daily use by fishing families rather than preserved purely for tourists — a distinction worth keeping in mind about noise, privacy, and where it’s polite to point a camera.

    How to Get to Ine from Kyoto

    There’s no direct train to Ine, so budget half a day of travel each way. The standard route from Kyoto Station: take the JR limited express “Hashidate” (about 2 hours, roughly ¥4,500–5,000 with reserved seat) to Amanohashidate Station, then transfer to a Tankai Bus bound for Ine (about 30 minutes, around ¥880). Buses run roughly once an hour, not more, so check the return schedule before you commit to a stop — missing the last bus back means a taxi (about 30–40 minutes, ¥5,000+) or an unplanned overnight stay.

    If you’re combining the trip with the sandbar at Amanohashidate, this works well as a two-stop day: sandbar in the morning, bus to Ine in the early afternoon. Driving from Kyoto takes about 2 hours via the Maizuru-Wakasa Expressway and gives you far more flexibility with bus timetables, which is the main argument for renting a car for this particular trip.

    Best Way to See the Bay: Boat Tour vs. Walking

    Walking the shoreline road is free and lets you see the funaya up close, but the view that actually explains the town is from the water. The Ine Bay round-trip sightseeing boat (Ine-wan Meguri) departs from the pier near the tourist information center roughly every 30–60 minutes between about 9:00 and 16:00, runs a 25-minute loop, and costs around ¥1,000 for adults and ¥500 for children. Buy a bag of rice crackers on board (about ¥100) and the seagulls that trail the boat will eat straight from your hand — it’s a small thing but it’s the moment most visitors remember. On windy days the boat can be suspended, so this isn’t a guaranteed activity if you’re visiting in typhoon season.

    For the classic postcard shot of the whole bay, walk or drive up to Funaya no Sato Park, a free viewpoint above the town. It’s a stiff 10–15 minute walk uphill from the bus stop, or a short drive if you’re self-driving.

    Best Season and Time of Day

    Ine is pleasant most of the year, but a few things affect timing. Late spring (April–May) and autumn (October–November) bring calm seas and comfortable walking weather. Summer is humid and can bring boat cancellations during typhoon season (August–September); winter brings cold winds straight off the Sea of Japan, though the town is far quieter and the bay is often glassy-calm on clear days. Aim to arrive by early-to-mid afternoon — the bus schedule and short winter daylight hours make a rushed evening visit impractical, and the boat tour stops running around 16:00.

    Where to Eat and What to Buy

    Several funaya have been converted into small cafés and restaurants serving the day’s catch — expect grilled or simmered fish, seafood-topped rice bowls (kaisendon), and set lunches in the ¥1,200–2,500 range at places like Ine Funaya Chaya, a converted boathouse right on the water. For something to bring home, Mukai Shuzo, a local sake brewery a short walk from the bay, is known for being run by an all-female brewing team, unusual in an industry historically dominated by male toji; tasting flights typically run a few hundred yen per pour, with bottles available for purchase on site.

    One practical note: Ine has no convenience stores and only a couple of small shops, so if you want snacks, drinks, or specific souvenirs beyond what’s sold at the pier, pick them up beforehand at a supermarket in Kyoto or at Amanohashidate — see this guide to grocery shopping in Japan if you want to know what’s worth grabbing. If you buy sake or other bottles you don’t want to carry for the rest of your trip, it’s worth reading up on shipping souvenirs home from Japan before you leave Ine.

    Where to Stay: Sleeping in a Funaya

    A dozen or so funaya operate as minshuku (family-run guesthouses), and spending a night in one is the single best way to experience the town after the day-trip buses have cleared out. Expect simple tatami rooms, shared or basic private bathrooms, and dinner built around whatever the family caught that day. Rates typically run ¥13,000–25,000 per person per night including two meals. Rooms are limited and fill up fast for weekends and holiday periods, so book at least a month or two ahead through the Ine tourism association or a Japanese-language booking site — English-language availability is limited, and a hotel or your accommodation elsewhere in Kyoto may be able to help with the reservation call.

    Common Mistakes to Avoid

    • Treating it as a quick photo stop. Between the infrequent buses and the boat tour timing, a rushed 45-minute visit means you’ll likely only see the town from the road, missing the water view that makes the trip worthwhile.
    • Not carrying cash. Card acceptance is inconsistent at the boat ticket booth, small cafés, and the sake brewery — bring enough yen for the day.
    • Assuming Ine and Amanohashidate are a quick hop apart. The bus ride is real travel time, not a shuttle; build at least an hour each way into your plan and check the return timetable before you head out.
    • Ignoring weather for the boat tour. On windy or stormy days it may not run at all — have the shoreline walk and the hillside viewpoint as a backup plan.
    • Forgetting these are working homes. Many funaya are lived-in fishing houses, not museum exhibits — keep noise down and be considerate about photographing private entrances.
  • Setsubun: Japan’s Bean-Throwing Festival and Where to Join In

    Setsubun: Japan’s Bean-Throwing Festival and Where to Join In

    Photo by Juliana Barquero on Unsplash

    Every February, Japanese temples and shrines fill with shouting crowds, flying roasted soybeans, and grown adults in oni (demon) masks getting pelted by children. This is Setsubun, one of the few Japanese festivals where tourists aren’t just welcome to watch — they’re welcome to throw. If you’re in Japan in early February, it’s one of the easiest, cheapest, and most memorable cultural events to work into your itinerary.

    What Is Setsubun, and When Is It?

    Setsubun (節分) literally means “seasonal division.” In the old lunar calendar, it marked the last day of winter, the day before risshun (the start of spring). The date is calculated astronomically each year, so it isn’t always fixed — it falls on February 3 in most years, but it shifted to February 2 in 2021 and 2025 due to how the solar calendar lines up with the equinox calculations. If your trip is scheduled around this time, check a Japanese calendar (or search “setsubun” plus the year) a few weeks out to confirm the exact date, since temple event schedules are built around it.

    The core belief is simple: the turn of the season is when evil spirits (oni) slip through the cracks between worlds. Throwing beans at them, loudly, drives them out and invites good fortune in for the year ahead.

    Mamemaki: How the Bean-Throwing Ritual Works

    The main event is called mamemaki (豆まき) — literally “bean scattering.” Someone dresses as an oni, usually in a red, blue, or black mask, and everyone else throws roasted soybeans (fukumame, “lucky beans”) at them while shouting “Oni wa soto! Fuku wa uchi!” (“Demons out, luck in!”). Afterward, tradition says you should eat one roasted soybean for each year of your age, plus one extra for good luck in the coming year.

    At home, this is a family activity — one parent puts on a mask, the kids pelt them with beans, then everyone eats their count of soybeans. Convenience stores and supermarkets sell small bags of fukumame for around ¥100–¥300 in the weeks before the festival, often bundled with a paper oni mask. If you’re staying in an apartment or guesthouse with a kitchen, picking up a bag at a local supermarket or a discount chain like the one covered in our guide to grocery shopping in Japan is a fun, low-effort way to try the ritual yourself.

    At temples and shrines, mamemaki becomes a public spectacle: priests, monks, celebrities, sumo wrestlers, and local “toshi otoko/toshi onna” (people born in that year’s zodiac sign, considered especially lucky) throw handfuls of beans — and sometimes wrapped sweets or coins — off a stage into a crowd that scrambles to catch them. Watching is free at nearly every venue; catching a bean is the whole game.

    Ehomaki: The Lucky Direction Sushi Roll

    The other Setsubun custom you’ll see everywhere, especially in convenience stores and supermarkets, is ehomaki (恵方巻き) — a thick, uncut sushi roll eaten in complete silence while facing that year’s designated “lucky direction,” which is determined by the zodiac calendar and changes annually. You’re supposed to eat the whole roll without stopping to talk, making a wish as you go.

    Convenience stores like 7-Eleven, Lawson, and FamilyMart start taking pre-orders for ehomaki in mid-January, with basic rolls running ¥500–¥900 and deluxe versions with premium seafood or wagyu going for ¥1,500–¥3,000. Department store basement food halls (depachika) sell even more elaborate versions, and some sushi restaurants offer a Setsubun ehomaki course for ¥3,000–¥6,000 if you want the full sit-down experience rather than a grab-and-go roll.

    Best Temples and Shrines to Join In

    If you want more than a convenience-store bean bag, head to one of the temples or shrines that hold large public mamemaki ceremonies on Setsubun:

    • Sensoji (Asakusa, Tokyo) — Tokyo’s most famous temple holds one of its biggest annual crowds for Setsubun. Uniquely, the chant here drops “oni wa soto” entirely and only shouts “fuku wa uchi,” based on the belief that Kannon’s compassion means no being is cast out. 5 minutes on foot from Asakusa Station (Ginza Line, Asakusa Line, or Tobu Skytree Line).
    • Naritasan Shinshoji (Narita) — Famous for celebrity guests and sumo wrestlers throwing beans from a huge stage; one of the largest Setsubun events in the Kanto region. About 10 minutes on foot from Narita Station, making it an easy stop if you have a layover near the airport. Tickets for a numbered raffle bag of beans (with a chance at prizes) typically cost around ¥1,000.
    • Zojoji (Tokyo, near Tokyo Tower) — Draws sumo wrestlers and public figures for its bean-throwing stage, with Tokyo Tower as a backdrop.
    • Yasaka Shrine (Gion, Kyoto) — Held over February 2–3, with maiko and geiko from Kyoto’s different geisha districts performing dances before the bean throwing. A short walk from Gion-Shijo Station or a bus ride from Kyoto Station.
    • Rozan-ji (Kyoto) — Less crowded but arguably more theatrical: three demons in red, blue, and black — representing greed, anger, and foolishness — perform the Oni Odori demon dance while priests chant sutras to drive them out, followed by mamemaki. Near Kyoto Imperial Palace, about 15 minutes on foot from Marutamachi Station.
    • Ikegami Honmonji (Tokyo) — A large temple in southern Tokyo that also draws celebrity guests; reachable via Ikegami Station on the Tokyu Ikegami Line.

    If you’re building a temple-hopping day in Kyoto — Yasaka Shrine in the morning, Rozan-ji in the afternoon — a rental bike can save a lot of walking between sites; see our guide to city bike rentals in Kyoto and Tokyo for stations and pricing.

    Getting There and Practical Tips

    Main ceremonies usually run in the early-to-mid afternoon, often between 1:00 and 3:00pm, though smaller mamemaki sessions can happen multiple times through the day at bigger temples. Arrive at least 30–45 minutes early for popular ones like Sensoji or Naritasan — the areas directly in front of the stage fill up fast, and you want to be within throwing range to actually catch anything. Bring a bag or pocket you can open quickly; beans (and sometimes wrapped candy) come down in handfuls and it’s a genuine scramble.

    Entry to watch is free everywhere on this list. Some temples sell a separate raffle-ticket bag of beans for around ¥500–¥1,000, which is optional but gives you a souvenir and a shot at a prize drawing. Dress warmly — early February is one of the coldest stretches of the Japanese winter, and you’ll likely be standing outside for a while.

    Common Mistakes to Avoid

    • Assuming the date is always February 3. It moves in some years — double-check before you build your schedule around it.
    • Showing up right at the ceremony’s stated start time. By then the good viewing spots are already taken; early arrival matters more than punctuality here.
    • Trying to keep beans thrown at temple ceremonies as souvenirs. They’re food, meant to be eaten (or left where they fall) — pack the paper oni masks or a bag of unopened fukumame instead if you want something to take home.
    • Skipping smaller neighborhood shrines. Sensoji and Naritasan are spectacular but packed elbow-to-elbow; a local shrine’s mamemaki is far more relaxed and often just as fun to watch up close.

    Budget, Mid-Range, and Splurge Ways to Celebrate

    Budget: Buy a ¥100–¥300 bag of fukumame at a supermarket or convenience store, watch a free neighborhood shrine ceremony, and eat a ¥500–¥900 convenience-store ehomaki facing the year’s lucky direction.

    Mid-range: Buy a ¥500–¥1,000 raffle bean bag at a major temple like Naritasan or Zojoji, and pick up a ¥1,500–¥3,000 deluxe ehomaki from a depachika food hall afterward.

    Splurge: Book a sit-down ehomaki course (¥3,000–¥6,000) at a sushi restaurant, then catch the Yasaka Shrine geiko performances or Rozan-ji’s Oni Odori dance for a more elaborate, ritual-heavy version of the day.

    If you pick up an oni mask, a wrapped bag of fukumame, or a Setsubun-themed tenugui as a keepsake — many temple stalls sell seasonal ones, and our guide to tenugui covers how they’re traditionally used — and you’re near the end of your trip, check our guide to shipping souvenirs home from Japan for the cheapest way to get bulkier finds back without them taking up suitcase space.

  • Japanese Fountain Pens: Sailor, Pilot & Platinum — A Buyer’s Guide

    Japanese Fountain Pens: Sailor, Pilot & Platinum — A Buyer’s Guide

    Photo by Clark Young on Unsplash

    Japan is one of the last places on earth where the fountain pen is still a living, everyday tool — schoolchildren use dip-style calligraphy pens, office workers sign documents with gold nibs, and department store stationery floors stock more pen models than most Western cities have pen shops. If you’re even slightly curious about fountain pens, a Japan trip is the best pen-shopping opportunity you’ll ever get. Here’s how to navigate the “big three” — Sailor, Pilot, and Platinum — without overspending or buying the wrong nib.

    Meet the Big Three

    Pilot (founded 1918, Tokyo) is the largest and most internationally familiar, known for smooth, forgiving gold nibs and the retractable “Vanishing Point” (sold in Japan as the Capless). Sailor (Hiroshima, 1911) is the nib specialist — its “Naginata” and “Zoom” nibs are cut at unusual angles for calligraphic line variation, and it has a cult following among collectors for limited runs. Platinum (Tokyo, 1919) is the value-engineering brand: its “slip-and-seal” cap mechanism keeps ink from drying out even after a year of not writing, which makes its pens unusually forgiving for occasional users. All three sell pens ranging from ¥200 to well over ¥500,000, so knowing where your budget sits matters more than which brand you pick first.

    The Nib-Size Trap Almost Every First-Time Buyer Falls Into

    This is the single most important thing to know before you buy: Japanese nib sizing runs one to two steps finer than Western sizing. A Japanese “F” (fine) writes roughly like a Western extra-fine, and a Japanese “M” (medium) writes closer to a Western fine. If you normally write with a medium nib on a European or American pen, buy a Japanese “M” or even “B” (broad), not an “F.” This matters because Japanese nibs are engineered for vertical, dense kanji strokes, not looping Western cursive — a true fine nib here can feel scratchy and thin on lined notebook paper. Ask staff to let you test-write before buying anything above ¥5,000; nearly every specialty shop keeps testing sheets and loaner pens at the counter for exactly this reason.

    Budget Picks (Under ¥2,000)

    • Platinum Preppy (~¥220) — the pen most pen enthusiasts recommend as a first fountain pen anywhere in the world. Cheap, reliable, and it uses the slip-seal cap even at this price.
    • Pilot Kakuno (~¥1,100) — a slightly larger, ergonomic beginner pen with a smiley-face nib etching, popular as a gift for kids starting school.
    • Sailor Fude de Mannen (~¥1,650) — a bent, brush-like nib designed for bold, expressive strokes; genuinely different from anything sold outside Japan.

    These are widely stocked and make excellent, packable souvenirs — light, cheap enough to buy several, and not something customs will blink at.

    Mid-Range: The Sweet Spot (¥8,000–25,000)

    This is where Japanese pen-making genuinely shines and where most serious buyers should spend their budget:

    • Pilot Custom 74 (~¥12,000) — a 14k gold nib pen, smooth and reliable, often cited as the best value gold-nib pen made anywhere.
    • Platinum 3776 Century (~¥11,000–12,000) — the flagship demonstrating the slip-seal system, available in a wide range of nib grinds including specialty ones like the “UEF” ultra-extra-fine.
    • Sailor Pro Gear Slim (~¥15,000–18,000) — smaller-bodied, pocketable, and the easiest entry into Sailor’s famous nib line.
    • Pilot Custom 823 (~¥22,000) — a vacuum-filler with a large ink capacity, a favorite of people who write a lot in one sitting.

    Each brand uses its own proprietary cartridges and converters (they are not interchangeable across brands), so if you want to use bottled ink, buy the matching converter at the same time — staff will point you to the right one if you ask.

    Splurge: Collector and Maki-e Pens

    At the top end, Japanese pen-making shades into lacquer art. Sailor’s “King of Pens” (from around ¥90,000) is a large-format flagship with an oversized 21k gold nib. Platinum’s Izumo and Nakaya’s maki-e (gold lacquer) pens, hand-decorated by lacquer artisans, routinely sell for ¥150,000–500,000+ and are one-of-a-kind or limited to a handful of pieces. If this level interests you, treat it the way you’d approach fine jewelry shopping — our guide to buying Mikimoto and Akoya pearls has similar advice on verifying authenticity certificates and asking for detailed condition notes before committing to a big purchase.

    Where to Buy in Tokyo

    Itoya (2-7-15 Ginza, Chuo-ku; roughly 10:00–20:00 daily) is the best one-stop shop — twelve floors of stationery with a dedicated fountain pen floor stocking all three brands side by side, plus testing stations. Sekaido in Shinjuku (near the East Exit, open until around 20:00) has strong everyday stock and competitive prices. For collectors, Kingdom Note (locations in Shinjuku’s Odakyu Halc building and Marunouchi) specializes in limited editions, discontinued colors, and secondhand vintage pens you won’t find at general retailers — this is where serious enthusiasts go first. Most of these shops offer tax-free purchases for visitors spending over ¥5,000 in a single store; bring your passport and keep the pen in its sealed box until you’re through departure, as that’s typically a condition of the exemption.

    Common Mistakes to Avoid

    • Buying an “F” nib out of habit. As covered above, test before buying anything expensive.
    • Packing ink bottles in carry-on luggage. Bottled ink counts as a liquid under airline security rules; pack it in checked luggage or buy cartridges instead. If you’re shipping pens and ink home rather than carrying them, our guide to shipping souvenirs from Japan covers which couriers accept ink and how to pack fragile items safely.
    • Shopping during graduation and entrance-ceremony season (March–April). Fountain pens are a classic Japanese gift for new students and new employees, so popular models and gift-wrapping counters get busy and some colors sell out. Outside this window, shops are calmer and better stocked.
    • Missing seasonal ink releases. Sailor’s “Shikiori” and Pilot’s seasonal Iroshizuku colors are released and retired periodically, so a color you see in spring may be gone by autumn — buy it if you like it rather than waiting.

    If you’re building a full stationery haul, it’s worth pairing a pen-shopping afternoon with a browse through Jimbocho’s secondhand bookstore district, where several shops sell vintage paper and notebooks that pair well with a new nib. And if you want one more small, distinctly Japanese personal item to bring home alongside your pen, consider getting a hanko name stamp carved — it’s a similarly tactile, made-in-Japan souvenir that fits the same gift-shopping trip.

  • Noren: Japan’s Doorway Curtains and How to Use Them at Home

    Noren: Japan’s Doorway Curtains and How to Use Them at Home

    Photo by TJ Bruder on Unsplash

    Walk down almost any street in Japan and you’ll pass dozens of them: short fabric curtains, split up the middle, hanging in doorways and swaying slightly with the breeze from inside. These are noren (暖簾), and they’re one of the easiest, most versatile souvenirs you can bring home — cheap to buy, light to pack, and instantly recognizable once you know what to look for. Here’s how to read them while you’re traveling and how to actually use one once you’re back home.

    What Exactly Is a Noren?

    A noren is a fabric panel — usually cotton, linen, or a blend — hung across a doorway, storefront, or interior threshold, typically split into two or three vertical sections so people can walk through without lifting the whole thing. Historically they blocked dust, sun, and prying eyes while still letting air circulate, which is why they became standard at shop entrances, kitchen doorways, and the entrances to communal baths. Today they’re used for all three purposes plus a fourth: pure decoration. A dyed noren with a mountain scene or a single kanji character does the same visual job as a piece of framed art, except it moves with the airflow in a room, which is part of the appeal.

    Reading Japan’s Fabric Signage

    Noren carry real information, and knowing how to read them will save you from a few awkward moments. The most useful rule: a shop noren hanging outside the door means the restaurant or shop is open; when it’s taken down or brought inside, they’re closed, even if the lights are still on. If you’re standing outside a ramen shop wondering whether to go in, check for the noren before you check the hours posted on the door.

    At sento (public baths) and onsen, noren mark which entrance is for which gender — traditionally blue, indigo, or white for men and red or pink for women, though colors alone aren’t foolproof, so also check for the characters 男 (man) and 女 (woman). You’ll see this system in action at classic hot spring towns like Ginzan Onsen and Arima Onsen, where the noren-draped entrances are as photogenic as the baths themselves. Restaurant noren usually display the shop’s name, a single crest-like logo, or a food item dyed onto the fabric — half the fun of noren-spotting is guessing what a restaurant serves before you’ve read the menu.

    Where to Buy an Authentic Noren

    Kyoto is the best single place to shop, since the city’s Nishijin district has produced dyed textiles for centuries. The Nishijin Textile Center (near the Horikawa-Imadegawa intersection, open daily 9:00–17:00, free admission) sells noren alongside its kimono displays and is an easy add-on to a Kyoto itinerary. For higher-end, hand-dyed pieces, small indigo-dyeing ateliers around the Nishijin and Nishiki Market areas sell noren using traditional aizome (indigo) or shibori (tie-dye) techniques — look for shops with vats of dye visible from the street.

    In Tokyo, Kappabashi Kitchen Town (a few minutes from Tawaramachi Station on the Ginza Line) is where restaurants themselves buy noren, so you’ll find heavier-duty shop-style curtains alongside all the plastic food samples and knives; most shops there are open roughly 9:00–17:00 and many close Sundays. Department stores like Takashimaya and Isetan carry noren in their interior/housewares floors, a reliable option if you want something mid-range without hunting through side streets. For budget options, Muji and Daiso both sell simple cotton noren sized for standard doorways — useful if you just want to try the idea out before spending more. If you’re already stocking up on textile souvenirs, it’s worth pairing a noren purchase with a stop for tenugui, since many of the same dye shops sell both.

    Budget, Mid-Range, and Splurge Options

    Prices vary enormously depending on dye technique and fabric.

    • Budget (¥1,100–2,500): Machine-printed cotton or cotton-linen noren from Muji, Daiso, or department store basics sections. Fine for a first noren or a casual spot like a closet doorway.
    • Mid-range (¥4,000–9,000): Dyed cotton noren from craft shops in Kyoto or Kappabashi, often with traditional motifs — waves, cranes, family crests (kamon), or a single bold kanji. This is the sweet spot for most visitors.
    • Splurge (¥20,000–80,000+): Hand-dyed indigo or shibori pieces from artisan ateliers, sometimes made to custom size or with a commissioned design. These are the ones you’ll see framed as art rather than hung in a doorway.

    Sizing and Hanging a Noren at Home

    Standard Japanese noren for home use are usually sized around 85–90cm wide by 90–120cm long for a single panel, though shop-style noren run longer. Before buying, measure your doorway’s width and the height from the top of the frame to where you want the fabric to end — most people hang noren so the bottom sits at chest or shoulder height rather than floor length, since the point is airflow and a peekaboo view, not full privacy.

    To hang one, look at the top edge: most noren have a fabric sleeve (tobukuro) or loops (chikan) sewn along the top for a rod to pass through. A simple tension rod (the same kind used for shower curtains) fits perfectly in most doorframes and requires no drilling — this is the easiest option for renters. Slide the rod through the sleeve, wedge it into the frame, and you’re done. If your noren has individual loops instead of a full sleeve, you’ll need a rod with removable end caps so you can thread the loops on one at a time.

    Common Mistakes to Avoid

    The most frequent issue is buying a noren sized for a narrow Japanese interior doorway (often around 80cm) and getting home to find your doorway is significantly wider — measure before you buy, not after. Second, indigo-dyed noren can bleed dye the first few washes; hand-wash separately in cold water the first couple of times, or better, ask the shop whether the piece is colorfast before buying if you plan to wash it often. Third, don’t assume every noren with kanji on it is decorative in a generic way — some display an actual restaurant name or a specific shop’s crest, which is a fun souvenir but a slightly odd thing to hang as art without knowing what it says, so ask the shop staff to translate before you buy if that matters to you. Finally, resist the urge to buy the first plain one you see at the airport; airport gift shops mark noren up well beyond what you’d pay in Kyoto or at Kappabashi.

    Getting It Home

    Noren are genuinely easy travel souvenirs — they fold flat, weigh almost nothing, and fit in a suitcase without needing extra padding. If you’re buying a larger or higher-end piece and don’t want to risk folds setting into expensive dyed fabric, rolling it around a cardboard tube before packing helps, or you can have it shipped; see our guide to shipping souvenirs home from Japan for a comparison of post office and courier options. Once you’re home, a noren works well in a kitchen doorway, a closet entrance, or even as a small wall hanging — and if you liked the process of hunting one down, the same regional craft-shopping mindset applies well to other traditional goods, like the folk pieces described in our guide to Tohoku’s kokeshi dolls.

  • Taiyaki & Imagawayaki: Japan’s Fish-Shaped Sweet Snacks

    Taiyaki & Imagawayaki: Japan’s Fish-Shaped Sweet Snacks

    Photo by mos design on Unsplash

    Walk past almost any train station, festival stall, or shopping arcade in Japan and you’ll catch the smell of hot batter and sweet red bean before you see the source: a griddle full of fish-shaped or disc-shaped cakes, flipped by hand and sold piping hot in a paper sleeve. These are taiyaki and imagawayaki, two of Japan’s most beloved cheap sweets, and they make a genuinely satisfying snack between sightseeing stops — no reservation, no menu to decipher, usually under ¥300.

    What’s the difference between taiyaki and imagawayaki?

    Both are made from a pancake-like batter cooked in a hinged iron mold and filled with sweet paste, but the shapes and origins differ. Taiyaki (鯛焼き) is molded into the shape of tai, a red sea bream considered a lucky fish in Japan — you’ll see the fins, scales, and even a little face pressed into the batter. Imagawayaki (今川焼き) is round and flat, more like a thick, filled pancake, and goes by regional names too: ōbanyaki in parts of Kansai, kaiten-yaki or taikoyaki elsewhere. Despite the different names, the cooking method and typical fillings are nearly identical, so if you see one but not the other on a menu, don’t worry — you’re getting the same basic treat.

    A short history

    Imagawayaki is generally considered the older format, dating to the Edo period and named after the Imagawabashi bridge in Tokyo near where it was first sold. Taiyaki came later, credited to Naniwaya Sōhonten, a shop that opened in Azabu-Juban, Tokyo, in 1909 and is still running today. The fish shape was reportedly a marketing decision — tai was associated with celebration and good fortune, and the distinctive mold helped the snack stand out from plainer round cakes. Both spread nationwide through festival food stalls (yatai), which is still one of the most common places to find them, especially at summer matsuri and New Year shrine visits.

    Where to find them

    You don’t need to hunt these down — they show up in a few predictable spots:

    • Specialty shops: Long-running taiyaki-only shops still exist in Tokyo, and they’re worth a detour. Naniwaya Sōhonten in Azabu-Juban is the historic original. Yanagiya in Sugamo and Kuruma in Ningyocho both use the traditional “ippiki-yaki” method — cooking one fish at a time in an individual iron mold rather than a multi-fish plate — which gives a thinner, crispier shell. Expect a short queue at peak times (weekend afternoons) and be ready to eat standing up or on a nearby bench, since most of these shops are takeout-only.
    • Department store basements (depachika): Most major department stores have a sweets floor with a taiyaki or imagawayaki counter, useful if you want an air-conditioned, easy-to-find option while shopping.
    • Festival stalls and shopping streets: Any shotengai (covered shopping street) or festival will likely have a stall. If you’re already exploring an old-school food alley like the one covered in our guide to Omoide Yokocho, keep an eye out nearby — sweet stalls often cluster around savory ones in these districts.
    • Convenience stores and supermarkets: Packaged, ready-to-microwave taiyaki (often frozen) are sold at chains like Lawson and at general supermarkets. If you’re already doing a grocery run, our guide to grocery shopping in Japan covers how to navigate these stores, and the freezer aisle is worth a look for a fun, cheap souvenir snack.

    What to order: fillings explained

    The classic filling is tsubuan, chunky sweet red bean paste, or koshian, the smoother strained version — both made from azuki beans and less sweet than most Western desserts. Beyond that, common options include:

    • Custard (カスタード): A thick vanilla custard, popular with kids and a safe bet if you’re unsure about red bean.
    • Chocolate or matcha: Common modern additions, especially at shops aimed at tourists.
    • Sweet potato (imo-an) or chestnut: Seasonal, often appearing in autumn.
    • Savory versions: Some shops sell taiyaki filled with mentaiko-mayo, cheese, or curry — a nice option if you want something less sweet.

    A single taiyaki typically runs ¥150–¥250 for a basic red bean or custard version, up to ¥350–¥450 for premium fillings like whole chestnut or matcha cream at specialty shops. Imagawayaki is usually priced similarly, often sold in sets of two or three for a small discount.

    Best time to go, and common mistakes

    These snacks are sold year-round, but they’re at their best fresh off the griddle, so aim to buy from a shop that’s actively cooking rather than a pre-made display case — you can usually tell by the smell and the visible batter griddle. Mid-afternoon (2–5pm) tends to be quieter than the post-lunch or early-evening rush near train stations. Winter is peak season psychologically — a hot taiyaki in cold hands is a genuine pleasure — but shops run the griddles all summer too.

    A few things visitors commonly get wrong:

    • Assuming it’s like a churro or funnel cake. The batter is closer to a thin sponge cake or pancake, not deep-fried, so the texture is softer and less greasy than you might expect.
    • Biting from the tail first. Locals often eat from the head, where there’s usually more filling packed in — though honestly there’s no wrong way to eat one.
    • Expecting to sit down and eat. Most taiyaki and imagawayaki shops are walk-up counters with no seating. Factor this into planning if you’re juggling luggage or a stroller.
    • Overpaying at tourist-zone stalls. Around major tourist sites like Asakusa, prices can run ¥50–¥100 higher than a neighborhood shop. Neither is a rip-off at these snack prices, but it’s worth knowing if you’re comparing.

    Budget, mid-range, and splurge options

    At the budget end, a convenience-store frozen taiyaki costs around ¥150–¥200 and reheats in a microwave — a fine option if you’re staying somewhere with a kitchenette. Mid-range means a standard shop-fresh taiyaki with red bean or custard, ¥150–¥300, which covers the vast majority of what you’ll encounter. For a splurge, seek out an ippiki-yaki specialist like Yanagiya or Kuruma, where the individually cooked, crisp-shelled version costs a bit more (¥250–¥400) but is a noticeably different, better product than the mass-produced multi-mold version — worth the wait if you have 15–20 minutes to spare.

    These snacks travel poorly if you want to bring them home — the batter goes stale within a day or two, and there’s no shelf-stable version worth carrying in luggage — so treat taiyaki and imagawayaki as an eat-now souvenir rather than something to pack. If you’re looking for snacks that do ship or pack well, our onigiri guide and fruit sando guide cover other convenience-store and bakery finds worth trying during the same trip, and both make good companions to a taiyaki stop on a walking day.

  • Natto: How to Eat Japan’s Fermented Soybeans (and Learn to Love Them)

    Natto: How to Eat Japan’s Fermented Soybeans (and Learn to Love Them)

    Photo by Seiya Maeda on Unsplash

    Natto is the dish that divides visitors to Japan more than any other. Ask a room full of travelers about it and you’ll get a chorus of groans about the smell, the stringy texture, and the “gym sock” comparisons that seem to follow it everywhere online. But natto is also a genuine cornerstone of the Japanese breakfast table, cheap, nutritious, and available in every convenience store in the country. If you’re going to encounter it anyway — sitting on a hotel breakfast buffet, tucked into a bento, or offered by a homestay host — you may as well learn how to eat it the right way. Done properly, natto is far less alarming than its reputation suggests, and plenty of visitors end up quietly hooked.

    What Exactly Is Natto?

    Natto is whole soybeans fermented with Bacillus subtilis (natto bacteria), a process that breaks down the beans’ proteins and coats them in a sticky, stringy web of amino acids. That stringiness — called neba-neba in Japanese — is the defining trait of natto, and it’s also the biggest hurdle for newcomers. The smell is often described as sharp, cheesy, or ammonia-like, somewhere between strong cheese and fermented tofu. The flavor itself is much milder than the smell suggests: earthy, nutty, slightly sweet, with a savory backbone from the fermentation.

    Nutritionally, natto is a powerhouse. A single 40–50g pack delivers around 8g of protein, plenty of fiber, and vitamin K2, which is a big reason it’s associated with health and longevity in Japan. It’s also cheap: a three-pack of small styrofoam containers costs roughly ¥100–¥150 at any supermarket or convenience store.

    How to Eat It Properly

    The classic way to eat natto is over a bowl of warm white rice for breakfast, but there’s a technique to it that makes a real difference in texture and flavor:

    • Stir it first. Open the container, remove the small packets of sauce and mustard usually tucked inside the lid, and stir the beans vigorously with chopsticks for 15–20 seconds before adding anything else. This whips air into the stringy fermentation strands and actually mellows the smell while improving the texture — skipping this step is the single most common reason people find natto unpleasant.
    • Add the sauce, not soy sauce straight. Most packs come with a small packet of tare (a soy-based sauce) and sometimes karashi mustard. Add both, then stir again. If there’s no sauce packet, a small splash of soy sauce works fine.
    • Spoon it over rice. Pour the stirred natto over a bowl of hot rice and mix lightly. The heat from the rice releases more aroma, so some people prefer to let the rice cool slightly first if the smell bothers them.
    • Common additions. A raw egg yolk, chopped green onion, grated daikon, or a few drops of sesame oil are all standard mix-ins that soften the flavor and are worth trying if the plain version doesn’t win you over immediately.

    A common mistake first-timers make is eating it straight from the container without stirring, or pairing it with something delicate like plain toast — natto is built to be a rice condiment, and it works far better in that context than on its own.

    Where to Buy and Try Natto

    You don’t need to seek out anywhere special — that’s part of the point. Every convenience store (Lawson, 7-Eleven, FamilyMart) and every supermarket in Japan stocks multiple brands and grain sizes, typically in the refrigerated section near tofu and eggs. Look for brands like Takano Foods’ “Okame Natto,” Mizkan, or regional co-op brands. Grain size varies: hikiwari (chopped, smaller pieces) has a milder smell and smoother texture, and is often the easiest entry point for beginners, while whole-bean natto has more bite and a stronger aroma. If you’re doing your own grocery shopping during your trip, natto is a great item to pick up alongside other everyday Japanese staples — the Gyomu Super & Local Supermarkets guide covers how to navigate Japanese grocery stores as a visitor, including how to read unfamiliar packaging.

    For a sit-down introduction rather than a DIY one, many traditional Japanese-style breakfast sets (wafuku asagohan) at ryokan and business hotels include a small pack of natto alongside grilled fish, miso soup, and rice. This is often the gentlest way to try it, since it comes portioned correctly with rice and sauce already provided.

    Regional Notes and Best Time to Try It

    Natto is eaten year-round, but it’s most prominently featured at breakfast, so the best time to try it is during your first hotel or ryokan breakfast rather than as a dinner experiment. Ibaraki Prefecture, just northeast of Tokyo, is considered the natto capital of Japan and is where Mito-brand natto originated; if you’re passing through the Tohoku region on a wider itinerary — say, after visiting Ginzan Onsen or the Zao Onsen ice monsters — you’ll find natto is an even more central part of local breakfast culture than in Tokyo. Note that natto is markedly less popular in western Japan (Kansai and further west), where some households and restaurants skip it entirely, so don’t expect it as a default in Osaka or Kyoto the way you might in the east.

    Budget, Mid-Range, and Splurge Ways to Try It

    • Budget (¥100–¥150): A three-pack from any convenience store or supermarket. This is genuinely how most Japanese people eat it, so there’s no need to spend more to get an “authentic” experience.
    • Mid-range (¥600–¥1,200): A traditional breakfast set at a business hotel or diner-style restaurant (like a Yoshinoya or a local teishoku shop) that includes natto, rice, miso soup, grilled fish, and pickles as a full plate.
    • Splurge (¥2,500+): A kaiseki-style ryokan breakfast, where natto might be presented in a small lacquered bowl alongside a much more elaborate multi-course spread — the setting elevates a humble ingredient into something quite refined.

    Common Mistakes to Avoid

    • Not stirring enough. Under-stirred natto is stickier, smellier, and less pleasant. Thirty seconds of stirring is not excessive.
    • Eating it cold and plain. Straight from the fridge with nothing added is the least forgiving way to experience it.
    • Assuming one bad experience is final. Grain size, brand, and additions vary enough that it’s worth trying hikiwari with egg and green onion even if whole-bean natto plain didn’t work for you.
    • Ordering it at a restaurant without rice. Natto is a topping, not a standalone dish — always pair it with rice.

    Whether or not natto becomes a favorite, it’s worth trying at least once with the right technique — stirred well, sauced properly, and spooned over warm rice — before writing it off. If you end up liking it, a few vacuum-packed or freeze-dried natto products are sold at supermarkets and are stable enough to bring home as an unusual souvenir; just check customs rules on fermented foods before packing them, and see the guide to shipping souvenirs home if you’d rather mail food items separately from your luggage.

  • Zao Onsen’s Ice Monsters: Yamagata’s Snow Monster Ski Resort

    Zao Onsen’s Ice Monsters: Yamagata’s Snow Monster Ski Resort

    Photo by pen_ash on Unsplash

    Every winter, wind and moisture turn a forest of fir trees on Mount Zao into an army of lumpy white giants — Japan calls them juhyo, “ice trees,” but everyone knows them as snow monsters. Zao Onsen, in Yamagata Prefecture, is the best place in the country to see them up close, ride a ropeway straight through the frozen forest, and then thaw out in one of Japan’s oldest hot spring towns. Here’s how to plan the trip.

    What Are the Ice Monsters, Exactly?

    The “monsters” are Aomori todomatsu (a type of subalpine fir) that get plastered with layer after layer of supercooled fog and wind-driven snow through the winter, freezing into thick, lumpy white shapes that can reach 8-10 meters tall. It’s a rare combination of geography and climate — cold Siberian winds picking up moisture over the Sea of Japan, then slamming into Mount Zao’s slopes — that makes this phenomenon so dramatic here. You’ll find juhyo at a handful of other Tohoku mountains, but Zao’s are the tallest, densest, and easiest to reach.

    When to Go: Best Season and Timing

    The ice monsters are a strictly winter phenomenon and they don’t appear overnight — plan around this window:

    • Late December-early January: Trees are still building up ice; shapes are smaller and patchier.
    • Mid-January to late February: Peak season, when the monsters are at their biggest and most photogenic. This is also peak crowds and peak cold (daytime highs often stay below freezing, with wind chill making it feel far colder).
    • March: Ice starts melting and shapes lose their definition; by early April they’re gone entirely.

    For the classic photos, aim for late January through mid-February. If you can, go on a clear day — the ropeway runs even in poor visibility, but you’ll see nothing but white fog from the gondola windows. Sunny mornings, right after a fresh snowfall, give the best contrast between blue sky and white ice. During part of February, the resort also runs a night illumination event, lighting up the monsters after dark for a completely different, eerie atmosphere — check the current year’s dates before you go, as they shift annually and the ropeway’s evening hours are extended only on those nights.

    Getting to Zao Onsen

    Zao Onsen sits in the mountains above Yamagata City. The standard route from Tokyo:

    • Take the JR Yamagata Shinkansen from Tokyo Station to Yamagata Station (around 2 hours 40 minutes).
    • From Yamagata Station’s bus terminal, catch a local bus bound for Zao Onsen (roughly 40 minutes, around ¥1,000 one way). Buses run regularly during ski season but thin out later in the day, so don’t leave the mountain too late.

    If you’re coming from Sendai, direct buses to Zao Onsen also run during winter, which can be faster than routing through Yamagata. Roads into Zao are steep and frequently snow-covered — renting a car works, but only if you’re comfortable with winter driving and carry chains or a 4WD; the bus is the easier choice for most visitors.

    Riding the Ropeway to See the Snow Monsters

    The Zao Ropeway is a two-stage lift that carries you from the base village up through the juhyo forest to the summit area. The lower stage (Sanroku to Juhyo Kogen Station) runs you directly into the thick of the ice monsters, and this is where most people get their photos — you can also get off here and walk short trails between the trees. The upper stage continues to Jizo Sancho Station near the peak, where views open up over the Zao mountain range on a clear day.

    Round-trip fare for the full course (both stages) runs around ¥3,000 for adults, with a cheaper option if you only ride the lower stage to the juhyo forest. Gondolas typically run from around 8:30 or 9:00 AM until 5:00 PM, with reduced hours on stormy days — high winds occasionally suspend service entirely, so build a buffer day into your itinerary if the ice monsters are your main reason for visiting.

    Common mistake: underestimating the cold. Even mild-looking days at the base can be brutally windy at Jizo Sancho, 1,600 meters up. Bring proper winter layers, waterproof gloves, and boots with grip — the platforms and trails get icy. Sunglasses or goggles help too, since sun reflecting off snow is intense.

    Skiing and Snowboarding at Zao Onsen

    Beyond the ice monsters, Zao Onsen is one of Japan’s largest and oldest ski resorts, with terrain spread across several interconnected areas and runs suited to everyone from beginners to experts. A one-day adult lift pass generally costs somewhere around ¥6,000-7,000, with half-day and multi-day discounts available, and rental shops at the base cover skis, boards, and outerwear if you’re not traveling with gear. Night skiing runs on select courses during high season. The resort is less crowded and cheaper than Niseko or Hakuba, and skiing directly past frozen juhyo trees on the upper courses is a genuinely unique experience you won’t find at bigger-name resorts.

    Soaking in Zao’s Hot Springs

    Zao Onsen has been a hot spring destination for over a thousand years, and its water is famously strong — highly acidic sulfur springs said to be some of the most potent in Japan, milky white or pale green depending on the source. After a cold day on the ropeway or slopes, this is the payoff. The town has several public bathhouses (sotoyu) open to anyone for a small fee, typically around ¥450-550, including Shinzaemon-no-yu, Kawara-yu, and Ue-no-yu — no reservation needed, just walk in. There’s also a free foot bath (ashiyu) near the bus terminal if you just want a quick warm-up between sightseeing stops. Many ryokan in town also offer day-use bathing for outside visitors, usually in the ¥800-1,500 range, if you want a quieter, more private soak. For a similarly atmospheric but very different-looking Tohoku hot spring town, Ginzan Onsen, with its gaslit wooden inns, makes a great add-on if you’re touring Yamagata Prefecture.

    Planning Tips and Budget

    Zao Onsen works well as a long day trip from Yamagata or Sendai, but an overnight stay lets you catch the ropeway early before crowds and buses arrive, and gives you time for a proper onsen soak at night. Budget travelers can do the ropeway and a public bathhouse for well under ¥5,000 total; mid-range visitors adding a ski pass and ryokan stay should expect ¥15,000-25,000 per day including meals; a splurge would be a ryokan with in-room hot spring baths and kaiseki dinner, which can run ¥30,000+ per person per night. If you’re picking up souvenirs on the way through Tohoku — Yamagata is within reach of craft towns known for kokeshi dolls — and you end up buying more than fits in your suitcase, it’s worth knowing your options for shipping souvenirs home from Japan before you leave the region.